
Most task management tools give you a fixed structure and ask your team to adapt to it. Quixy works the other way around.
This page covers exactly how Quixy task management works— from how tasks are created and routed through workflows, to how your team views, filters, prioritizes, and acts on them. If you’re evaluating Quixy and want to understand what it actually does before booking a demo, this is the right place to start.
Want to see how Quixy compares to tools like Asana, Monday.com, and ClickUp? See the full task management software comparison →
Want to understand how to build a custom task system from scratch? Read the no-code task management build guide →
Do you know? The Task Management Trends Report reveals that only 12.4% of contributors get 6+ hours for tasks, with just 53.3% being productive. Managers rate distraction control at 5.3/10 and seek to free 9.4 hours weekly per team member
Also Read: Version Management Benefits: Leverage Quixy for Better Project Tracking

How Task Management Works Inside Quixy
Understanding Quixy’s task management starts with one key difference from standard tools: tasks in Quixy are not manually added to a list. They are created automatically at each step of a workflow process.
Here’s what that means in practice. When someone submits a purchase request, a service ticket, or a compliance form in Quixy, the system automatically creates a task and routes it to the right person or team — based on rules you define. That assignee receives the task in their inbox, sees exactly what’s needed from them, takes action, and the task moves to the next stage. No manual assignment. No email threads. No status meetings.
Every task in Quixy carries the following:
- Owner — who is responsible for the current action
- App and Workspace — which process and organizational unit the task belongs to
- Stage — where the task sits in the workflow (e.g., Under Review, Pending Approval, In Progress)
- Form data — all the information submitted and updated at each stage
- Action history — a timestamped log of every action taken, by whom, and when
- Attachments and comments — files, photos, and notes added at any stage
- Deadline and SLA status — how much time is left, and whether an escalation has triggered
Tasks can be ad-hoc (created once, for a specific need) or repeatable (triggered on a schedule, such as weekly checklists or monthly audits). Every user has a unified task inbox that shows all their pending actions across every app and workflow in one place — so nothing gets missed.
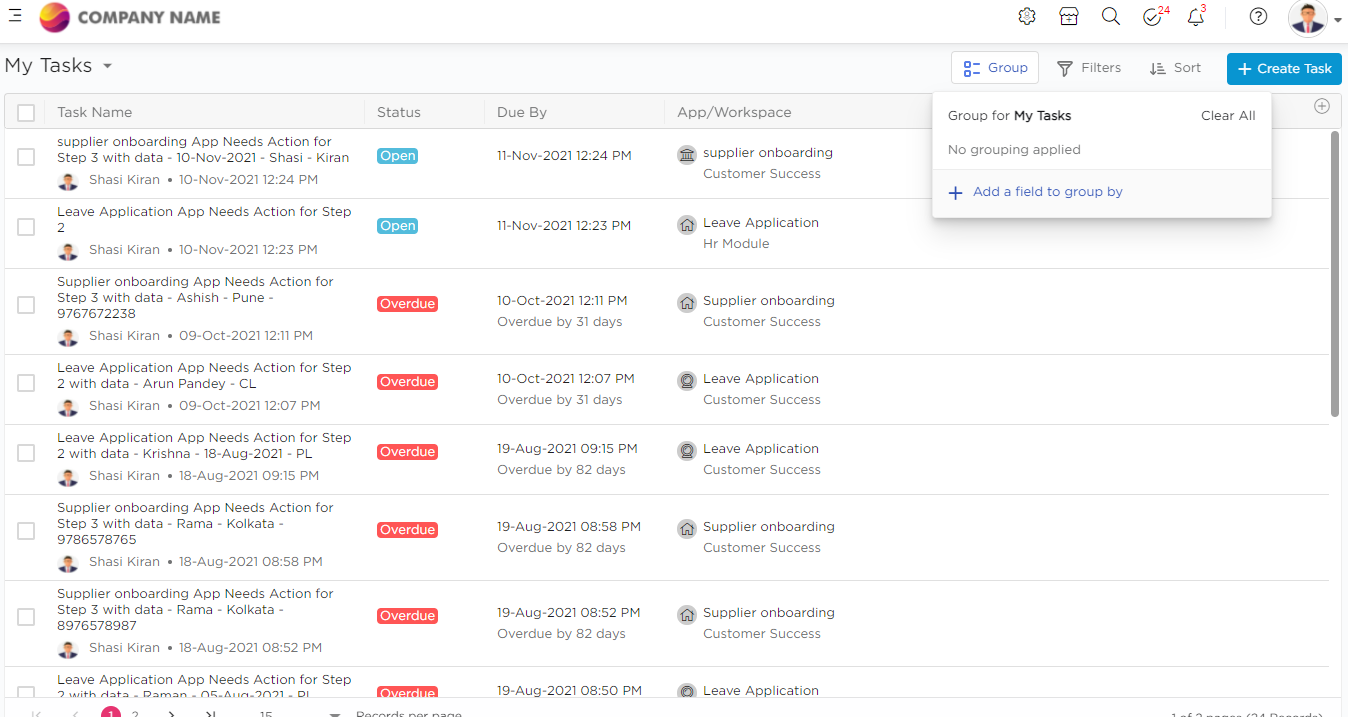
Quixy’s Custom Task Views: Group, Filter, and Sort
One of Quixy’s most powerful — and most used — capabilities is the ability for each user to organize their task view exactly the way they need it. Rather than everyone seeing the same fixed list, Quixy’s task management is built on three key pillars of customization.
Group
Tasks can be grouped by any meaningful dimension — application, workspace, process stage, priority, assigned team, or any custom field you’ve defined. Grouping creates a drill-down view with collapsible sections, so a team lead can instantly see all tasks by department, or a project manager can see all tasks by project phase.
For example, an operations manager overseeing three regions can group tasks by Region → Site → Status — giving them a real-time layered view of exactly what’s happening at every level, without switching between screens.
Filter
Apply filters to show only the tasks that matter right now. Filter by:
- Created date or due date range
- Initiator or assignee
- Process stage or task status
- Custom field values (e.g., Priority = High, Category = Electrical, Region = North)
- Overdue tasks only
Filters can be combined — so you can instantly surface, for example, all high-priority tasks across a specific project that are overdue and unassigned. This is the kind of view that would take minutes to construct in a spreadsheet and is available in Quixy in two clicks.
Sort
Sort tasks by any field to instantly prioritize your work queue. Sort by due date to see what needs attention first. Sort by priority level to triage your inbox. Sort by creation date to review the oldest unresolved items. Sort by any custom field — stage duration, cost, severity — to surface what your workflow requires.
Grouping, filtering, and sorting work together, and every combination can be saved as a named view that a user returns to with one click. Each person’s saved views are personal to them — a field technician’s default view looks nothing like a finance manager’s, and both are exactly right for their role.
Beyond Task Views: Quixy’s Full Task Management Feature Set
Custom views are one component of a comprehensive task management system. Here is the complete set of capabilities Quixy brings to task management — each described in terms of what it does and the specific business problem it solves.
Kanban Board View
Visualize every task as a card moving through configurable workflow stages. Each column represents a stage — To Do, In Progress, Under Review, Blocked, Complete — and cards display key task details at a glance. Teams can spot bottlenecks immediately when cards pile up in one column, and drag-and-drop reassignment keeps work moving without navigating away from the board.
Workflow Automation Engine
Set trigger-based rules that fire automatically without human intervention. If a task is unactioned for 48 hours, send an escalation alert to the supervisor and mark it as high priority. If a form field equals a specific value, route the task to a different team. If a deadline passes, auto-generate a follow-up task and notify the project manager. All of this is configured visually — no scripting, no formulas.
Automated Task Allocation
Tasks don’t just get created — they get assigned to the right person automatically. Quixy’s assignment logic can route tasks based on workload, expertise, team membership, geographic location, or any field value in the triggering form. A service request submitted from the Mumbai office goes to the Mumbai IT team. A high-value procurement request goes to the senior approver. No manual triage required.
Custom Task Forms and Fields
Every task in Quixy is backed by a form that captures exactly the data needed at that stage — no more, no less. Fields are built using a drag-and-drop form designer and can include text, numbers, dates, dropdowns, file uploads, signatures, QR code scanners, and lookups from other data tables. Conditional logic controls which fields appear based on previous answers, keeping forms clean and relevant. Custom fields like Project Code, Client Name, Effort Hours, or Budget Line follow the task through every stage of the workflow.
Role-Based Data Access
Control what each person sees at the field level. A field agent sees their own assigned tasks and the specific form fields relevant to their action. A team lead sees their department’s task queue and workload distribution. An executive sees aggregate KPI dashboards. Sensitive data — budget figures, personal information, contract values — is visible only to roles with explicit permission. This is not just a usability feature — it’s an enterprise governance requirement that most standard task tools cannot meet.
Real-Time Dashboards and Reports
Every user in Quixy can configure their own dashboard with the charts, filters, and data tables that matter to their role. Dashboards update live as tasks move through the workflow. Available visualizations include bar charts, line charts, pie charts, data tables, KPI tiles, and drill-down reports. Managers can build a dashboard that shows task completion rates, SLA compliance, overdue counts, and team workload in a single view — and share it with stakeholders without requiring them to log in.
Time Tracking
Capture the exact time spent on every task, project activity, training session, R&D effort, and meeting. Time tracking data feeds directly into project cost dashboards and team productivity reports, giving managers visibility into where time is actually going — not where it was estimated to go. This is especially valuable for billable work, resource planning, and process improvement initiatives.
Mobile App with Offline Access
Field teams and remote employees access and update tasks from any device — iOS or Android. Quixy’s mobile app is fully functional without an internet connection: tasks can be viewed, forms can be filled, photos can be captured, and signatures can be collected offline. All data syncs automatically when connectivity is restored. This is non-negotiable for industries like construction, field services, logistics, and healthcare — where work happens far from a desk.
Geo-Fencing
Restrict task completion to a specific physical location. A field technician can only mark a site inspection as complete when they are physically on-site. A delivery confirmation can only be submitted at the delivery address. Geo-fencing enforces accountability for location-sensitive tasks without requiring supervisors to be present — and creates a verifiable location record in the task audit trail.
Notifications and Escalations
Configure SMS, email, and in-app alerts at every workflow stage. Notifications are fully customizable — the message, the recipient, the trigger condition, and the timing are all set by you. Escalation chains ensure that no task waits indefinitely: if action isn’t taken within a defined window, the system automatically notifies the next level of the hierarchy and adjusts task priority. Live task data can be embedded directly in notification messages, so recipients know exactly what they’re being asked to do before they open the app.
Caddie AI
Quixy’s built-in AI assistant, Caddie, surfaces insights from your task and workflow data in real time. Caddie identifies bottlenecks in active workflows, highlights tasks at risk of missing their deadlines, suggests process optimizations based on historical patterns, and generates reports on demand. Rather than waiting for a weekly status meeting to discover that a critical task has been stuck for three days, Caddie flags it the moment the pattern emerges. Task management shifts from reactive tracking to proactive orchestration.
Integrations
Quixy connects with your existing technology stack — ERP systems, CRMs, HRMS platforms, Google Workspace, Microsoft 365, Slack, and more. Task data flows across systems in real time via native connectors and open APIs, eliminating manual data entry and the silos that come from disconnected tools. Quixy also supports DigiLocker integration for document verification workflows and QR code scanning for inventory and asset-linked tasks.
Quixy Task Management in Action: Use Cases by Department
HR — Automated Employee Onboarding
A new hire acceptance triggers a task chain automatically. IT receives a task to set up accounts and provision devices. Admin receives a task to prepare the workstation and access card. HR receives tasks for documentation, policy briefing, and benefits enrollment. The hiring manager receives a Day 1 welcome task and a 30-day check-in reminder. Every task has a hard deadline. Every missed deadline escalates to the HR manager. The entire onboarding status — for every new hire, across every department — is visible on a single dashboard. Nothing is forgotten. Nothing is followed up manually.
IT — Service Request and Resolution
An employee submits a service request through Quixy’s self-service portal — selecting category, urgency, and providing a description with attachments. The system auto-assigns the request to the right IT sub-team based on category. An SLA timer begins immediately. The requester receives automated status updates as the request moves through triage, in-progress, and resolution stages. If the SLA is breached, an escalation fires to the IT manager. Closure triggers a one-click satisfaction survey. Every request is searchable, auditable, and reportable — with full resolution history.
Field Operations — Inspection and Compliance
Field inspectors receive geo-tagged inspection tasks on their mobile devices. They complete a structured digital checklist on-site, with mandatory photo capture for each finding. Geo-fencing ensures the form can only be submitted at the correct location. Findings automatically trigger corrective action tasks assigned to the relevant site team. Supervisors see real-time inspection status across all sites on a live map dashboard. Compliance reports are auto-generated from submitted data — no manual consolidation, no lost paper forms.
Finance — Purchase Request and Approval Chain
A purchase request is submitted in Quixy — capturing vendor details, line items, cost codes, and supporting documents. The workflow routes the request through a multi-level approval chain based on value thresholds: team lead for requests under a set limit, finance director above it. Each approver sees full context and can approve, reject, or query with comments. Approved requests notify procurement automatically and update the budget tracking dashboard in real time. The complete chain — from request to payment — is timestamped, traceable, and available for audit.
Compliance — Audit Checklist and Escalation
Compliance checklists are assigned as tasks in Quixy with hard deadlines. Each team member completes their section in a structured digital form — responses are validated at the point of entry, not discovered to be incomplete during review. The compliance officer reviews all submissions in a single queue, with filters to surface outstanding items. Overdue submissions trigger automatic escalations to department heads. Once all submissions are received, Quixy auto-generates the consolidated compliance report — formatted and ready for submission.
Quixy vs. Managing Tasks in Email and Spreadsheets
For many organizations evaluating Quixy, the real competition is not Asana or Monday.com — it’s the combination of email threads and shared spreadsheets they are currently using. Here is an honest comparison.
| The Problem with Email + Spreadsheets | How Quixy Resolves It |
|---|---|
| Tasks buried in email chains; no single source of truth | Every task lives in a central, trackable system with full history |
| “Who owns this?” is a constant question | Every task has a named owner, deadline, and accountability trail |
| Manual reminders and follow-up emails eat hours | Automated escalations and reminders fire without any human effort |
| No audit trail for compliance or disputes | Every action is logged with timestamp, user identity, and data state |
| Spreadsheets break as team and task volume grows | Quixy scales to thousands of tasks and users without performance issues |
| Each department works in a different format | Unified platform with role-specific views for every team and function |
| Reporting requires manual data collection | Real-time dashboards and auto-generated reports update as tasks complete |
| Process changes require rebuilding the spreadsheet | Quixy workflows are updated in minutes using QuickEdit, with zero downtime |
What Quixy Customers Have Achieved
Nekkanti Sea Foods (Manufacturing) Quixy accelerated application development by over 60% and improved workforce productivity by 15%. Critical processes were automated, creating a single source of truth for operational information across the organization.
Vendor Onboarding — Deployed in 4 Days A complete vendor onboarding application — including analysis, design, business rule configuration, complex workflow setup, and exception handling — was built and deployed in four days. Traditional development of equivalent complexity would typically take two to three months.
CFS Operations (Cargo Logistics) CFS import and export operations were automated using Quixy. Cargo dwell time reduced by 25% as a direct result of structured task workflows replacing manual coordination.
Industry Recognition
- Recognized in Gartner Hype Cycle reports for Digital Workplace Applications and Workforce Transformation
- Gartner Peer Insights “Voice of the Customer” recognition for Enterprise Low-Code Application Platforms — three consecutive years
- G2 Leader in No-Code Development
- National Startup Award 2023 — Rising Star
Enterprise Security and Compliance
Quixy is built for organizations where data security is non-negotiable. Key certifications and controls include:
- ISO/IEC 27001:2013 — globally recognized Information Security Management System standard
- SOC 2 Type 2 — independently audited for security, availability, and confidentiality
- Role-based access control — field-level data permissions across all apps and workflows
- Single Sign-On (SSO) — integrates with your existing identity provider
- Data encryption — at rest and in transit
- Geo-fencing — location-based task controls for field operations
- Audit logs — every action timestamped and attributable to a specific user
View Quixy’s full security and compliance documentation →
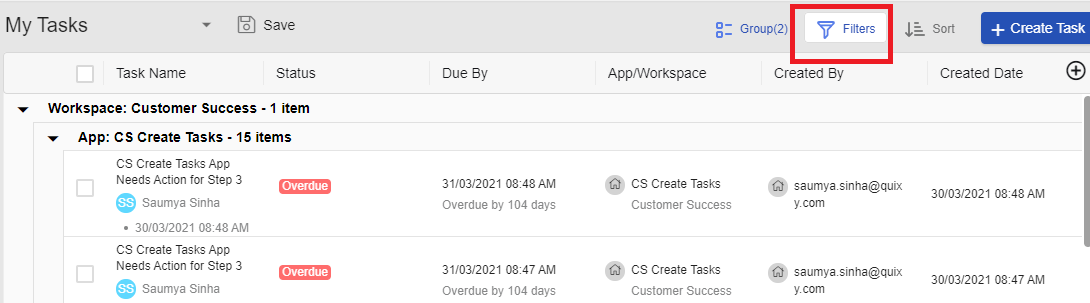
Steps for Task Management in Quixy
Group your Tasks
i. Grouping Icon is present on the top right corner of the Task Screen.
ii. If the user clicks on it, then the system provides columns to select Columns for grouping: Status, Created Date, Created By, Due By, App Name, Workspace Name, Tag, Field1, Field2, Field3.
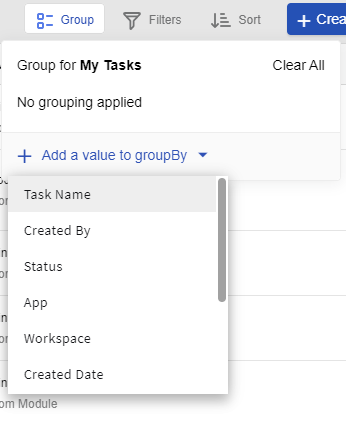
iii. If the user chooses a column and adds a group, then the system will show it by Group by - column name dropdown .
iv. After adding the required groups, the system will display the number of groups added in braces beside the Group button. As soon as a group is added/removed, the count will be updated , and the grouping effect on task results should be applied.
Also Read: Get quick help with Quixy’s Feedback feature
v. System will display the number of records for each group of records created.
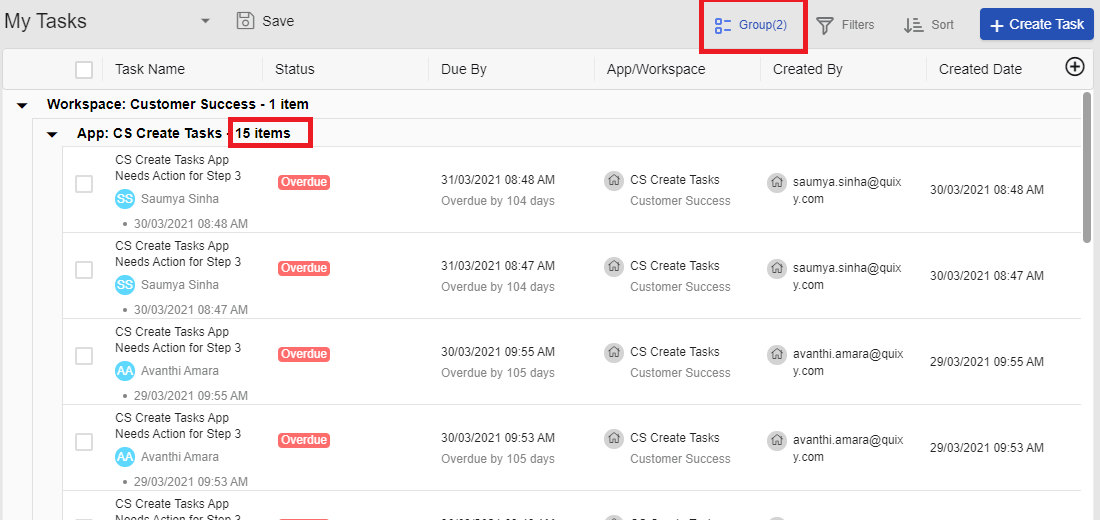
vi. If the 2nd level of grouping is applied then, the system would display nesting groups with steps inside.
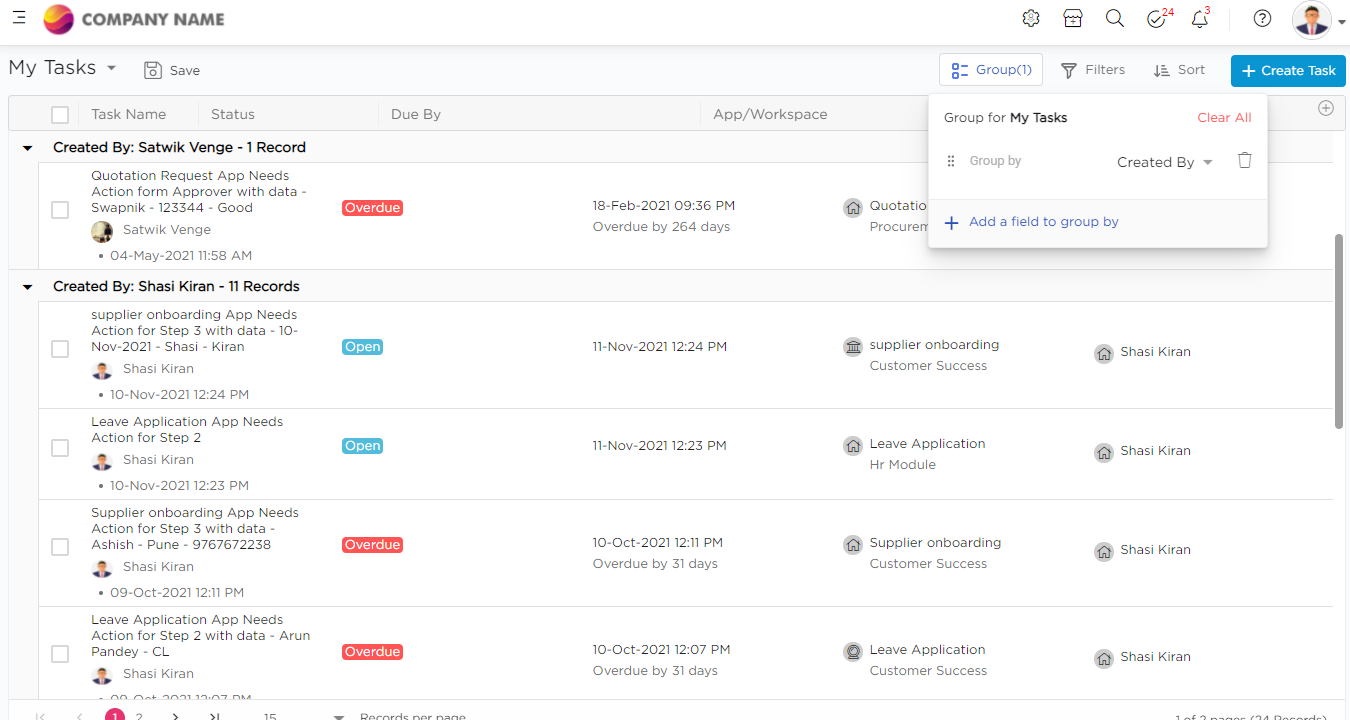
vii. The user can expand/collapse the Groups as per his requirement to see the number of tasks under each group.
Also read: Quixy’s Custom Notifications to Fast-track your Workflows
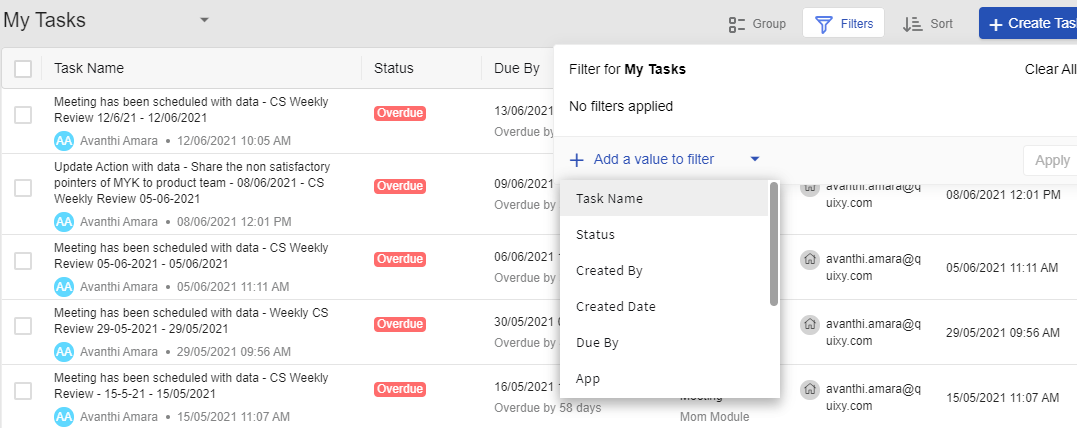
Apply filters
i. You will find the Filter Option in the top right corner of the Task Screen.
ii. Add a field to filters with the help of a select dropdown with the list of columns.
Columns available in Filters:
- Name of the Task
- Status of the Task (Completed/New/Over Due)
- Due Date of the Task
- Created By (According to the Task Initiator)
- Created Date of the Task: (Tomorrow, Yesterday, Current week etc.)
- App Name
- Workspace
- App Fields (Field 1, Field 2, Field 3)
iii. If the user is applying filters based on App Fields, then the System will provide operators based on the type of the field. For example:
- Text: Is, Contains with provision to enter text.
- Number: Equals to, Not equals to, greater than, less than, greater than or equal to, less than or equal to with provision to enter a numeric value.
- Date: Is operator with given values as mentioned in Due by.
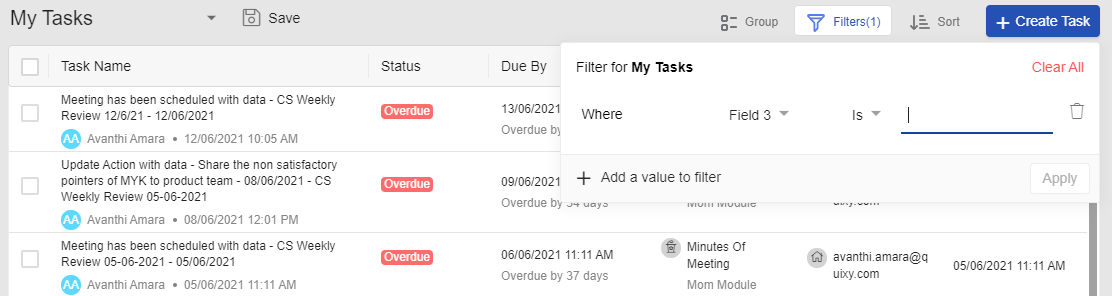
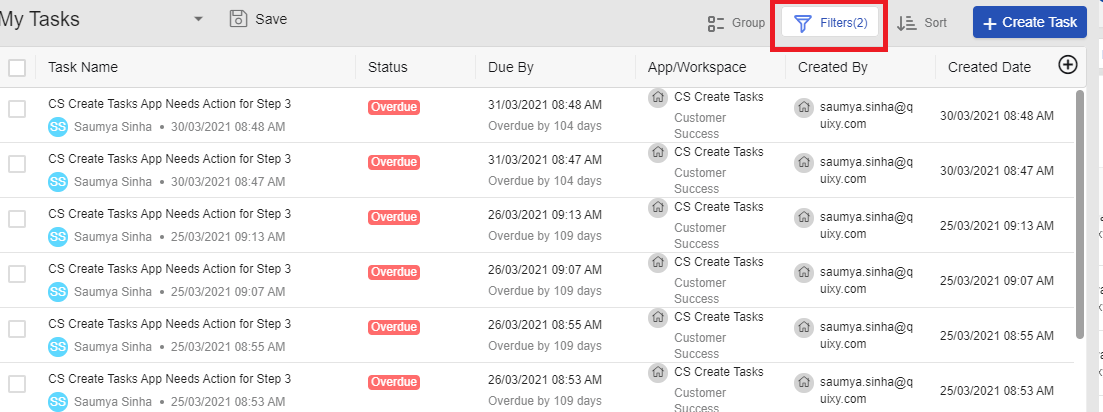
iv. As soon as the user adds filters for tasks, the system will display the number of filters added in braces beside the Filter button. The system will refresh the screen and update the task list after applying filters.
Watch Webinar: Promote Accountability and Drive Performance with Quixy Tasks
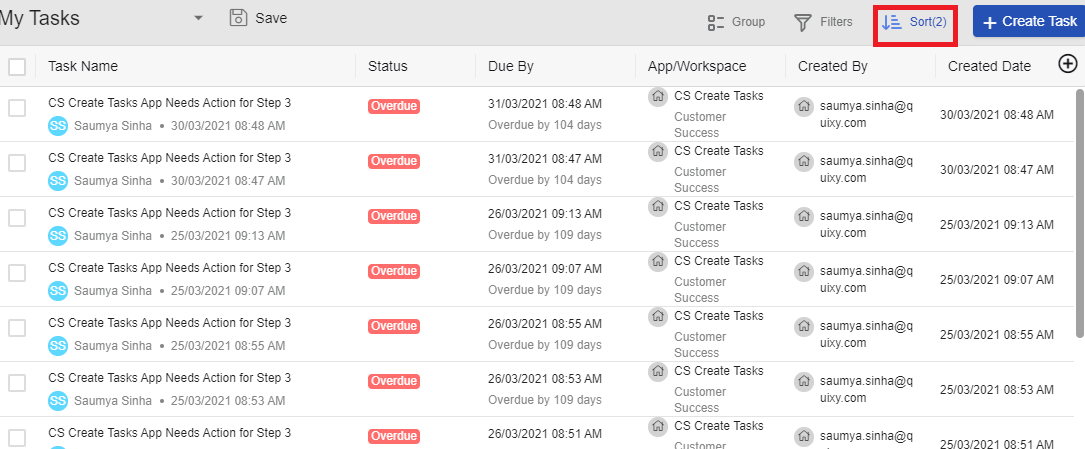
Sort Your Tasks
i. Sort Icon is present on the top right corner of the Task Screen.

ii. Add a field to sort by with the help of a Single select Dropdown to choose columns.
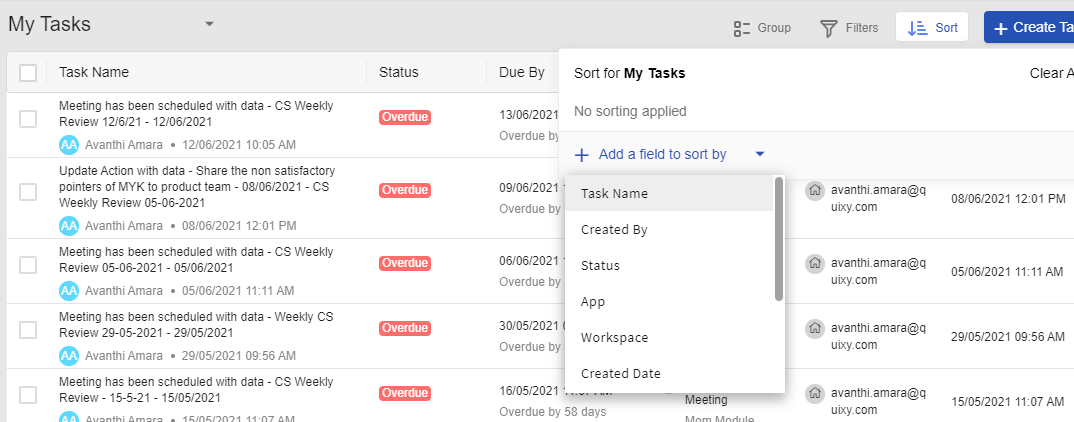
iii. Tasks can be sorted based on the following fields: Task Name, Status, Due By, Created By, Created Date, App, Workspace, Field1, Field2, Field3
iv. As soon as the user selects a column, the system should display sorting options based on the type of element. (The Ascending order is selected by default)
v. Text: A-Z and Z-A
vi. Number: 1-9 and 9-1
vii. Date: 1-9 and 9-1
viii. System should provide a provision to change the sorting order based on the type of column chosen.
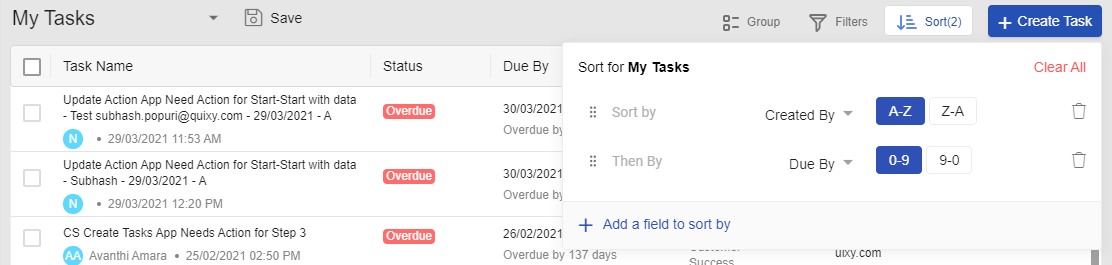
ix. As soon as the user adds fields for sorting, the system will display the number of sorts added in braces beside the Sort button. The system will refresh the screen and update the order of tasks as per the applied sorting.
Also Read: Boost Your Business with the 7 Best Task Management Software
Save Task View
i. User will be able to make customizations in the task screen and save it as a custom view.
ii. If the user makes any of the following changes, then the system will enable the Save button beside the My Tasks title .
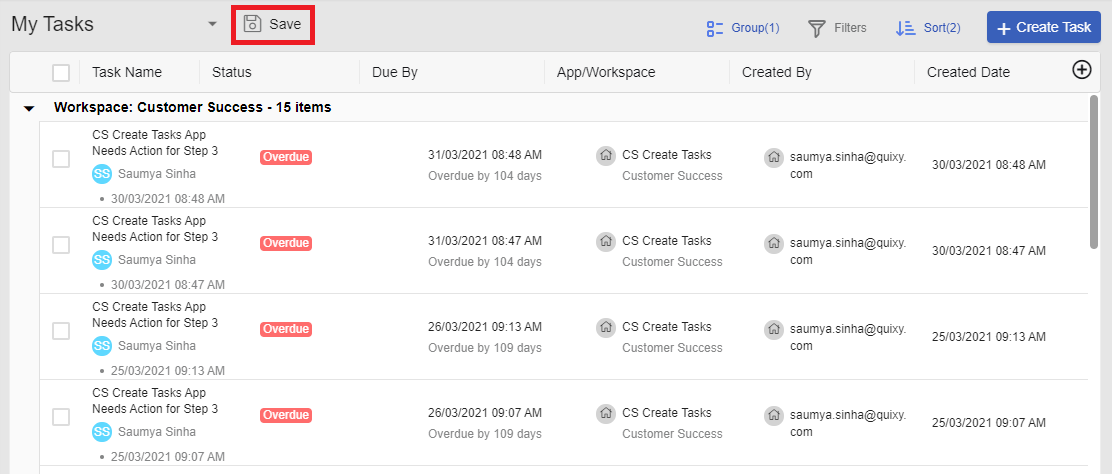
iii. If the user clicks on the save button, then the system will provide a popup with a provision to enter the name of the view.
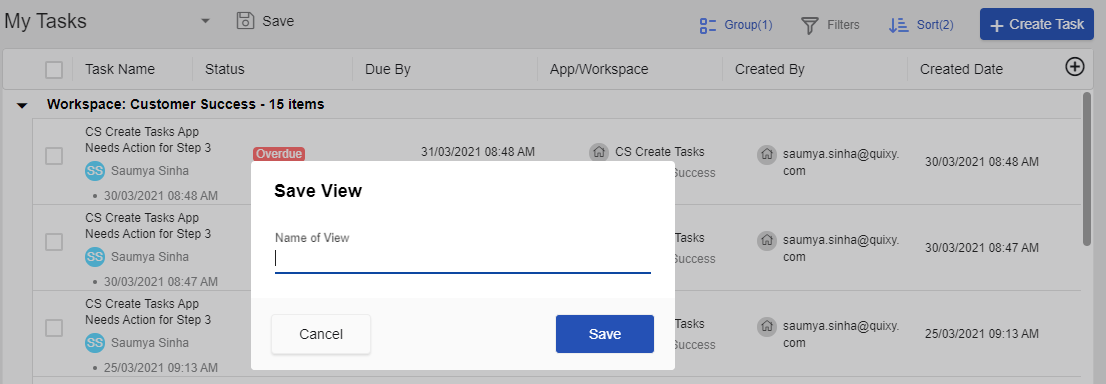
iv. System will disable the save button in a view till the user makes any change in view.
The Saved View will be Visible in the List of Task Views
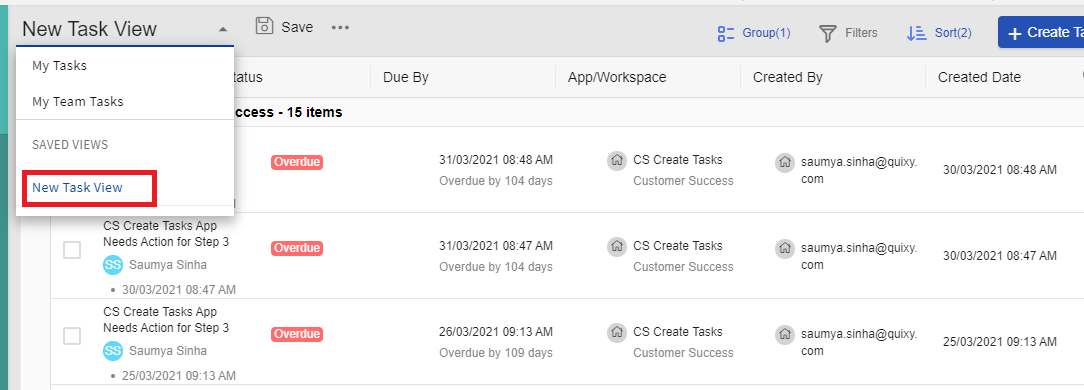
Brownie Tips!!
The Saved View can be tagged on the User’s Dashboard for better accessibility.
One user can create multiple Views and tag them on multiple Dashboards.
The Organization Admin and Workspace Admin can manage their and their Team’s Tasks from the task management window.
Getting Started with Quixy Task Management
How quickly can we be up and running? A first workflow can typically be configured, tested, and deployed within one to two days. A full departmental rollout with multiple workflows, custom dashboards, and integrations typically takes one to three weeks.
Is technical expertise required? No. Quixy is designed for business users — operations managers, HR coordinators, IT leads — not developers. The Sandbox environment lets your team build and test without any risk to live operations.
What does a demo cover? A Quixy demo walks through a workflow relevant to your use case, demonstrates the form builder and automation engine, shows the dashboard and reporting capabilities, and answers your specific questions about integration and deployment. No generic slides — the demo is built around your process.
Can we start with one department and expand? Yes, and it’s recommended. Most successful Quixy deployments start with one high-pain workflow, prove the value quickly, and expand to other departments over the following weeks and months. The platform is designed to scale without re-platforming.
With Quixy’s custom task management, you can take control of your work, not the other way around. Try it today and schedule a demo today to experience seamless productivity with Quixy!
Frequently Asked Questions ( FAQ)
What is efficient task management, and why is it important?
Efficient task management is the process of organizing, prioritizing, and executing tasks effectively to maximize productivity and minimize delays. It ensures that teams work collaboratively, meet deadlines, and achieve business goals without unnecessary bottlenecks. Effective task management leads to better time utilization, reduced stress, and improved overall efficiency.
What are the key challenges businesses face in task management?
Some common challenges in task management include:
1. Lack of clear task prioritization
2. Poor communication and collaboration
3. Missed deadlines due to inefficient tracking
4. Overloading employees with too many tasks
5. Difficulty in adapting to changing project requirements
Implementing structured workflows, automation tools, and transparent communication strategies can help overcome these challenges.
How can automation improve task management efficiency?
Automation eliminates manual and repetitive tasks, allowing teams to focus on high-value work. It streamlines task allocation, sends real-time updates, and enables automatic progress tracking. By integrating automation tools like Quixy, businesses can improve accuracy, enhance accountability, and accelerate task completion without human errors.
What are the best practices for prioritizing tasks effectively?
To manage tasks efficiently, consider these best practices:
Use the Eisenhower Matrix to categorize tasks as urgent, important, or unnecessary.
Apply the 80/20 rule (Pareto Principle) to focus on tasks that yield maximum impact.
Break down large tasks into smaller, manageable subtasks.
Set realistic deadlines and avoid multitasking, which reduces productivity.
How does Quixy’s custom task management improve productivity?
Quixy, a no-code task management platform, allows users to build and customize workflows tailored to their business needs. It provides real-time tracking, automated notifications, and seamless collaboration, reducing dependency on manual processes. With features like drag-and-drop task creation, deadline reminders, and data-driven insights, Quixy helps businesses optimize their efficiency.
How can businesses track task progress and team productivity efficiently?
Tracking task progress effectively requires a combination of tools and strategies:
1. Using dashboards & analytics to monitor real-time progress
2. Setting clear KPIs to measure team productivity
3. Implementing task dependencies to manage workflows smoothly
4. Utilizing automation to send updates and reminders
Platforms like Quixy provide visual dashboards and customizable reports, ensuring better control over task management.
Related Post


Login
Please login to comment
0 Comments
Oldest
Recent Posts


![]()
![]()
- Download the App